
Activity
在 Android 平台上,Activity 是应用的基本构建块之一。它们充当用户与应用互动的入口点,同时也决定了用户在应用内部或应用之间导航的方式。
在编写一个Activity时,我们的代码一般是这样
import android.app.Activity;
import android.os.Bundle;

public class ActivityTest extends Activity {

    @Override
    protected void onCreate(Bundle savedInstanceState) {
        super.onCreate(savedInstanceState);
        setContentView(R.layout.activity_test);
    }
}
这里是采用布局文件的方式。代码量很少,当然这里边就是一个空的Activity。采用这种方式还需要编写一个布局文件。
<?xml version="1.0" encoding="utf-8"?>
<android.widget.RelativeLayout xmlns:android="http://schemas.android.com/apk/res/android"
    xmlns:app="http://schemas.android.com/apk/res-auto"
    xmlns:tools="http://schemas.android.com/tools"
    android:layout_width="match_parent"
    android:layout_height="match_parent"
    tools:context=".ActivityTest">

</android.widget.RelativeLayout>
也可以采用纯代码编写Activity,这里可以写一个等同于上面例子的纯代码开发的Activity。
import android.app.Activity;
import android.os.Bundle;
import android.widget.RelativeLayout;

public class ActivityDevTest extends Activity {
    protected void onCreate(Bundle savedInstanceState) {
        super.onCreate(savedInstanceState);

        RelativeLayout contentLayoutView = new RelativeLayout(this);
        RelativeLayout.LayoutParams layoutParams = new RelativeLayout.LayoutParams(RelativeLayout.LayoutParams.MATCH_PARENT, RelativeLayout.LayoutParams.MATCH_PARENT);

        setContentView(contentLayoutView, layoutParams);
    }
}
Activity生命周期
以下是与Activity生命周期相关的函数
protected void onCreate(@Nullable Bundle savedInstanceState)
public void onCreate(@Nullable Bundle savedInstanceState, @Nullable PersistableBundle persistentState)
Activity启动的时候被调用。大多数初始化操作都从这里开始:调用setContentView方法来填充Activity的UI,使用findViewById以编程的方式和UI中的小部件进行交互,调用managedQuery方法获取数据游标以展示等等。
protected void onPostCreate(@Nullable Bundle savedInstanceState)
public void onPostCreate(@Nullable Bundle savedInstanceState, @Nullable PersistableBundle persistentState)
Activity完全启动之后被调用,即onStart,onRestoreInstanceState方法被调用后会调用onPostCreate方法。
protected void onDestroy()
protected void onStart()
在onCreate后被调用,或者Activity在被Stop之后,要重新启动起来,调用onRestart后也会调用onStart方法。
protected void onRestart()
protected void onStop()
protected void onResume()
在onRestoreInstanceState,onRestart,onPause后被调用。
protected void onPostResume()
protected void onPause()
onCreateView
这个方法其实不是Activity中的方法,而是在LayoutInflater中的Factory接口定义。但也跟Activity的生命周期有关。onCreateView方法有两个定义,一个是LayoutInflater.Factory中定义,还有一个是LayoutInflater.Factory2中定义。
LayoutInflater.Factory定义如下:
public interface Factory {
    @Nullable
    View onCreateView(@NonNull String name, @NonNull Context context,
            @NonNull AttributeSet attrs);
}
LayoutInflater.Factory2定义如下:
public interface Factory2 extends Factory {
    @Nullable
    View onCreateView(@Nullable View parent, @NonNull String name,
            @NonNull Context context, @NonNull AttributeSet attrs);
}
启动Activity
可以通过startActivity和startActivityForResult方法来启动一个Activity。
Activity实例的构造是由Android来完成的,不过有时候我们可能会重写Activity的构造函数,添加一些代码逻辑。不过很多方法不能在构造函数调用,如Activity提供的getIntent方法,这个方法在构造函数中调用的话返回的是NULL,在onCreate方法或其后的方法中调用才有返回。
startActivity
调用startActivity方法用于启动一个Activity。这个方法在Context中定义,有两种形式,一种是传入一个Intent,这个参数表示要启动的Activity。还有一种除了传入Intent,还传入一个Bundle,这是一个附加选项,用于决定如何启动Activity。这个参数也可以用于传递数据给启动的Activity,如传递参数等。如果这个参数传入null,则和第一种一样。
public abstract void startActivity(@RequiresPermission Intent intent);
public abstract void startActivity(@RequiresPermission Intent intent, @Nullable Bundle options);
Bundle就是一组键值映射的描述,有点类似哈希映射,不同的是,Bundle的键值都是一些Parcelable的值。Bundle类继承了BaseBundle,通过ArrayMap<String, Object>来存储键值信息,实现Map接口。
Parcelable
表示可打包的数据,有点类似Serializable。
另一个和Parcelable有关的概念,Parcel,表示一个包裹,即打包好的数据(Parcelled Data)。
如果不通过Bundle参数来传的话,也可以通过Intent的put*一系列方法来传递,如putExtra(String name, boolean value)、putExtra(String name, byte value)、putExtra(String name, char value)、putExtra(String name, int value)、putExtra(String name, @Nullable String value)、putExtra(String name, @Nullable Parcelable value)、putExtra(String name, @Nullable Serializable value)等。
Intent还提供了一个putExtra(String name, @Nullable Bundle value)方法还传递一个Bundle。
可以通过putExtra(String name, @Nullable Bundle value)、putExtra(String name, @Nullable Parcelable value)、putExtra(String name, @Nullable Serializable value)来传递一些较复杂的对象,后面两个要实现Parcelable接口和Serializable接口。
如果需要的话,当然也可以通过putExtra(String name, @Nullable String value),先将对象序列化字符串格式,如json格式,再以字符串的形式传递。
Intent的这些方法都是以键值的方式来传递数据。
        Intent intent = new Intent(this, Main.class);
        startActivity(intent);
调用startActivity方法启动Activity时,程序继续往startActivity方法调用后面的代码继续执行。LAUNCHER(启动)Activity不需要自己启动,安卓会自动帮我们启动。
在Activity上下文外面调用startActivity方法启动Activity的时候,比如在一个Application上下文,需要指定FLAG_ACTIVITY_NEW_TASK,否则会报以下错误。
android.util.AndroidRuntimeException: Calling startActivity() from outside of an Activity context requires the FLAG_ACTIVITY_NEW_TASK flag. Is this really what you want?
            Intent intent = new Intent(this, Login.class);
            intent.setFlags(Intent.FLAG_ACTIVITY_NEW_TASK );
            startActivity(intent);
一个Activity编写好了后,需要在配置清单中配置这个Activity。
<activity android:name=".Login" android:exported="false"></activity>
如果没有在配置清单配置这个Activity的话,调用startActivity方法启动这个Activity的时候会报一下错误。
java.lang.RuntimeException: Unable to create application app.App: android.content.ActivityNotFoundException: Unable to find explicit activity class {app/app.Login}; have you declared this activity in your AndroidManifest.xml?
包括LAUNCHER(启动)Activity,没有在配置清单配置的话,启动时会报一下错误。
Could not identify launch activity: Default Activity not found
Error while Launching activity
Failed to launch an application on all devices
还要在activity内部的intent-filter标签中配置action和category这两个标签,action的android:name指定为android.intent.action.MAIN,category的android:name指定为android.intent.category.LAUNCHER。
            <intent-filter>
                <action android:name="android.intent.action.MAIN" />
                <category android:name="android.intent.category.LAUNCHER" />
            </intent-filter>
startActivityForResult
    public void startActivityForResult(@RequiresPermission Intent intent, int requestCode) {
        startActivityForResult(intent, requestCode, null);
    }
    public void startActivityForResult(@RequiresPermission Intent intent, int requestCode,
            @Nullable Bundle options) {
        if (mParent == null) {
            options = transferSpringboardActivityOptions(options);
            Instrumentation.ActivityResult ar =
                mInstrumentation.execStartActivity(
                    this, mMainThread.getApplicationThread(), mToken, this,
                    intent, requestCode, options);
            if (ar != null) {
                mMainThread.sendActivityResult(
                    mToken, mEmbeddedID, requestCode, ar.getResultCode(),
                    ar.getResultData());
            }
            if (requestCode >= 0) {
                // If this start is requesting a result, we can avoid making
                // the activity visible until the result is received.  Setting
                // this code during onCreate(Bundle savedInstanceState) or onResume() will keep the
                // activity hidden during this time, to avoid flickering.
                // This can only be done when a result is requested because
                // that guarantees we will get information back when the
                // activity is finished, no matter what happens to it.
                mStartedActivity = true;
            }

            cancelInputsAndStartExitTransition(options);
            // TODO Consider clearing/flushing other event sources and events for child windows.
        } else {
            if (options != null) {
                mParent.startActivityFromChild(this, intent, requestCode, options);
            } else {
                // Note we want to go through this method for compatibility with
                // existing applications that may have overridden it.
                mParent.startActivityFromChild(this, intent, requestCode);
            }
        }
    }
需要实现onActivityResult方法来接收返回结果数据。以下是Activity中的空实现。 protected void onActivityResult(int requestCode, int resultCode, Intent data) {
}
                Intent intent = new Intent(getContext(), Post.class);
                startActivityForResult(intent, OP_POST);
启动跳转到一个叫Post的Activity,然后在Post这个Activity在返回到之前的Activity,即第一个Activity,通过调用setResult将返回的数据传回给之前的Activity。 Intent intent=new Intent();
intent.putExtra("content", input.getText().toString());
setResult(MyFragment.OP_POST, intent);
Post.this.finish();
最后在第一个Activity中实现onActivityResult方法来接收返回结果数据。 public void onActivityResult(int requestCode, int resultCode, @Nullable Intent data) {
super.onActivityResult(requestCode, resultCode, data);
if (requestCode == OP_POST && resultCode == OP_POST) {
addPost(data.getStringExtra("content"));
}
}
通过startActivity方法在传递数据,无法传一些复杂对象,比如传Activity、Fragment这样的参数,可以通过startActivityForResult来避免这样的情况。Activity启动模式
        <activity
            android:name=".***.Main"
            android:exported="false" android:launchMode="singleInstance"/>
Activity之间的交互
最常见的就是调用startActivity方法从一个Activity跳转到另一个Activity。
内容视图
public void setContentView(int layoutResID)
public void setContentView(View view)
public void setContentView(View view, LayoutParams params)
public void addContentView(View view, LayoutParams params)
导航栏
ActionBar
Fragment
E/AndroidRuntime: FATAL EXCEPTION: main
Process: app, PID: 20865
java.lang.RuntimeException: Unable to start activity ComponentInfo{app/app.old.m1.Main}: androidx.fragment.app.Fragment$InstantiationException: Unable to instantiate fragment app.old.m1.ContactsFragment: could not find Fragment constructor
at android.app.ActivityThread.performLaunchActivity(ActivityThread.java:3449)
at android.app.ActivityThread.handleLaunchActivity(ActivityThread.java:3601)
at android.app.servertransaction.LaunchActivityItem.execute(LaunchActivityItem.java:85)
at android.app.servertransaction.TransactionExecutor.executeCallbacks(TransactionExecutor.java:135)
at android.app.servertransaction.TransactionExecutor.execute(TransactionExecutor.java:95)
at android.app.ActivityThread$H.handleMessage(ActivityThread.java:2066)
at android.os.Handler.dispatchMessage(Handler.java:106)
at android.os.Looper.loop(Looper.java:223)
at android.app.ActivityThread.main(ActivityThread.java:7656)
at java.lang.reflect.Method.invoke(Native Method)
at com.android.internal.os.RuntimeInit$MethodAndArgsCaller.run(RuntimeInit.java:592)
at com.android.internal.os.ZygoteInit.main(ZygoteInit.java:947)
Caused by: androidx.fragment.app.Fragment$InstantiationException: Unable to instantiate fragment app.old.m1.ContactsFragment: could not find Fragment constructor
at androidx.fragment.app.Fragment.instantiate(Fragment.java:628)
at androidx.fragment.app.FragmentContainer.instantiate(FragmentContainer.java:57)
at androidx.fragment.app.FragmentManager$3.instantiate(FragmentManager.java:483)
at androidx.fragment.app.FragmentStateManager.<init>(FragmentStateManager.java:85)
at androidx.fragment.app.FragmentManager.restoreSaveState(FragmentManager.java:2728)
at androidx.fragment.app.FragmentController.restoreSaveState(FragmentController.java:198)
at androidx.fragment.app.FragmentActivity$2.onContextAvailable(FragmentActivity.java:149)
at androidx.activity.contextaware.ContextAwareHelper.dispatchOnContextAvailable(ContextAwareHelper.java:99)
at androidx.activity.ComponentActivity.onCreate(ComponentActivity.java:297)
at androidx.fragment.app.FragmentActivity.onCreate(FragmentActivity.java:273)
at app.FragmentActivity.onCreate(FragmentActivity.java:11)
at app.old.m1.Main.onCreate(Main.java:213)
at android.app.Activity.performCreate(Activity.java:7994)
at android.app.Activity.performCreate(Activity.java:7978)
at android.app.Instrumentation.callActivityOnCreate(Instrumentation.java:1309)
at android.app.ActivityThread.performLaunchActivity(ActivityThread.java:3422)
at android.app.ActivityThread.handleLaunchActivity(ActivityThread.java:3601)
at android.app.servertransaction.LaunchActivityItem.execute(LaunchActivityItem.java:85)
at android.app.servertransaction.TransactionExecutor.executeCallbacks(TransactionExecutor.java:135)
at android.app.servertransaction.TransactionExecutor.execute(TransactionExecutor.java:95)
at android.app.ActivityThread$H.handleMessage(ActivityThread.java:2066)
at android.os.Handler.dispatchMessage(Handler.java:106)
at android.os.Looper.loop(Looper.java:223)
at android.app.ActivityThread.main(ActivityThread.java:7656)
at java.lang.reflect.Method.invoke(Native Method)
at com.android.internal.os.RuntimeInit$MethodAndArgsCaller.run(RuntimeInit.java:592)
at com.android.internal.os.ZygoteInit.main(ZygoteInit.java:947)
Caused by: java.lang.NoSuchMethodException: app.old.m1.ContactsFragment.<init> []
at java.lang.Class.getConstructor0(Class.java:2332)
at java.lang.Class.getConstructor(Class.java:1728)
at androidx.fragment.app.Fragment.instantiate(Fragment.java:613)
at androidx.fragment.app.FragmentContainer.instantiate(FragmentContainer.java:57)
at androidx.fragment.app.FragmentManager$3.instantiate(FragmentManager.java:483)
at androidx.fragment.app.FragmentStateManager.<init>(FragmentStateManager.java:85)
at androidx.fragment.app.FragmentManager.restoreSaveState(FragmentManager.java:2728)
at androidx.fragment.app.FragmentController.restoreSaveState(FragmentController.java:198)
at androidx.fragment.app.FragmentActivity$2.onContextAvailable(FragmentActivity.java:149)
at androidx.activity.contextaware.ContextAwareHelper.dispatchOnContextAvailable(ContextAwareHelper.java:99)
at androidx.activity.ComponentActivity.onCreate(ComponentActivity.java:297)
at androidx.fragment.app.FragmentActivity.onCreate(FragmentActivity.java:273)
at app.FragmentActivity.onCreate(FragmentActivity.java:11)
at app.old.m1.Main.onCreate(Main.java:213)
at android.app.Activity.performCreate(Activity.java:7994)
at android.app.Activity.performCreate(Activity.java:7978)
at android.app.Instrumentation.callActivityOnCreate(Instrumentation.java:1309)
at android.app.ActivityThread.performLaunchActivity(ActivityThread.java:3422)
at android.app.ActivityThread.handleLaunchActivity(ActivityThread.java:3601)
at android.app.servertransaction.LaunchActivityItem.execute(LaunchActivityItem.java:85)
at android.app.servertransaction.TransactionExecutor.executeCallbacks(TransactionExecutor.java:135)
at android.app.servertransaction.TransactionExecutor.execute(TransactionExecutor.java:95)
at android.app.ActivityThread$H.handleMessage(ActivityThread.java:2066)
at android.os.Handler.dispatchMessage(Handler.java:106)
at android.os.Looper.loop(Looper.java:223)
at android.app.ActivityThread.main(ActivityThread.java:7656)
at java.lang.reflect.Method.invoke(Native Method)
at com.android.internal.os.RuntimeInit$MethodAndArgsCaller.run(RuntimeInit.java:592)
at com.android.internal.os.ZygoteInit.main(ZygoteInit.java:947)
FragmentActivity
这是一种支持Fragment(分片)的Activity。
AppCompatActivity
在程序中如果有引入AppCompatActivity,需要安装“Android Support Repository”:
import android.support.v7.app.AppCompatActivity;
Intent
Intent表示一个执行的操作。如果说Intent表示进行的某个活动,那么Activity则表示进行某个活动的结果展示。
Android将一些要执行的操作都抽象成一个Intent。
    public Intent(String action) {
        setAction(action);
    }
Android通过一个字符串来表示要执行的Action。
    public Intent(String action, Uri uri) {
        setAction(action);
        mData = uri;
    }
通过一个字符串来表示要执行的Action的时候,还可以传入一个uri参数。
    public Intent(Context packageContext, Class<?> cls) {
        mComponent = new ComponentName(packageContext, cls);
    }
Android将对某个组件执行的操作也抽象为Intent,如启动一个Activity。
    public Intent(String action, Uri uri,
            Context packageContext, Class<?> cls) {
        setAction(action);
        mData = uri;
        mComponent = new ComponentName(packageContext, cls);
    }
常见的调用startActivity、startActivityForResult方法启动一个Activity就是一个执行的操作Intent,所以调用这两个方法是要传入的intent参数表示要执行的操作,如要启动的Activity,要执行的Action,如ACTION_PICK,可以看Intent的源代码,它其实就是一个字符串类型,"android.intent.action.PICK"表示从从一个URI表示的目录中选择一个项目的Action,比如从相册中选择一张照片。
软键盘
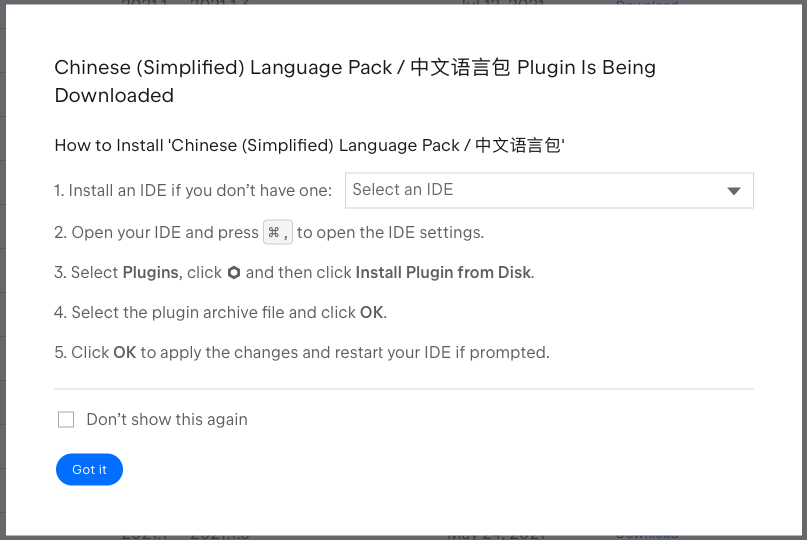
Chinese (Simplified) Language Pack / 中文语言包
中文语言包可以到以下这个插件网站上下载:
https://plugins.jetbrains.com/plugin/13710-chinese-simplified-language-pack----/versions
查看Android Studio版本并下载对应版本的中文语言包插件。如下Android Studio是211开头的版本,那么也选择211开头的中文语言包插件。

切换输入法
SoftInputMode
在停留在某个activity时,可能涉及到和软键盘的交互。可以通过设置软键盘输入模式来指定这种行为,即设置SoftInputMode。
参考android:windowSoftInputMode的定义,SoftInputMode定义了activity主窗口和窗口上的屏幕软键盘的交互行为,如软键盘的状态,当activity成为用户关注的焦点时,软键盘是显示还是隐藏,以及对activity的主窗口进行的调整,如调整主窗口的大小,使之变得更小,为软键盘腾出空间,或者当窗口的一部分被软键盘覆盖时,其内容平移以使当前焦点可见。
- The state of the soft keyboard — whether it is hidden or visible — when the activity becomes the focus of user attention.
- The adjustment made to the activity's main window — whether it is resized smaller to make room for the soft keyboard or whether its contents pan to make the current focus visible when part of the window is covered by the soft keyboard.
根据android:windowSoftInputMode的定义,这个属性会影响两个行为,一个是软键盘的状态,也就是显示还是隐藏,一个是对activity主窗口进行调整。
SoftInputMode可以在配置文件中设置,也可以通过代码设置。如果在配置文件中设置,在配置清单AndroidManifest.xml文件中,配置Activity的时候,在activity标签中指定android:windowSoftInputMode。
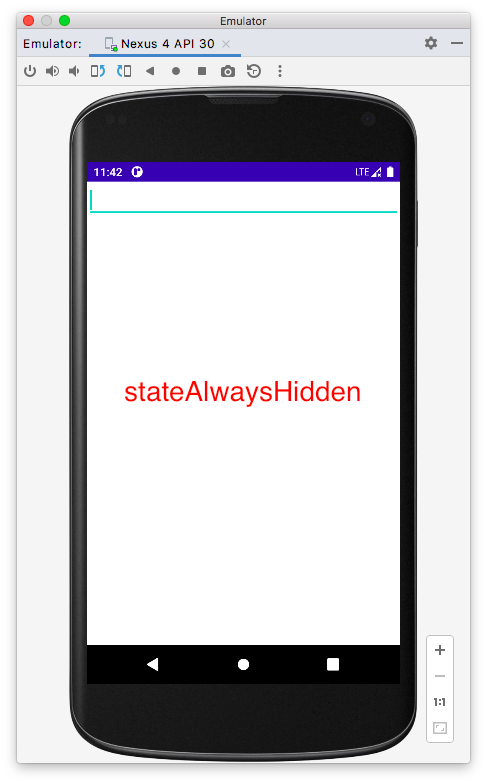
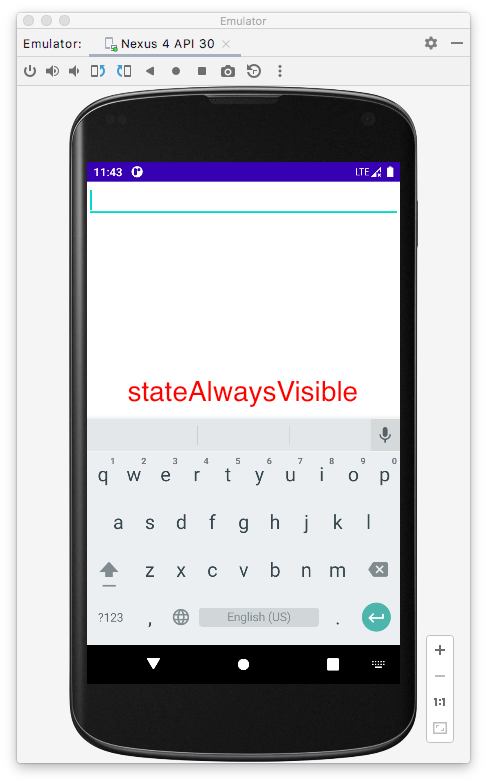
该属性可以指定为stateUnspecified、stateUnchanged、stateHidden、stateVisible、stateAlwaysHidden、stateAlwaysVisible、adjustUnspecified、adjustNothing、adjustResize、adjustPan。其中state开头的用于设置软键盘的状态,adjust开头的用于对activity主窗口进行调整。
该属性必须设置为上面的其中一个,或者一个state开头的和一个adjust开头的组合,中间以“|”分隔。不可以设置多个state开头的或者多个adjust开头的,这种设置的结果是未定义的“undefined”。
如果没有设置的话,默认情况为stateUnspecified和adjustUnspecified。
软键盘状态,是显示还是隐藏,即是否弹出软键盘,还要看可输入控件(或者说可编辑控件)是否获得焦点,如果没有获得焦点,就算是设置为stateVisible或者stateAlwaysVisible,软键盘也不会弹出显示。
通过窗口属性(实际上就是窗口的布局参数WindowManager.LayoutParams)可以获取当前的SoftInputMode,如下
getWindow().getAttributes().softInputMode
以上代码等同于
Window window = getWindow();
WindowManager.LayoutParams windowLayoutParams = window.getAttributes();
windowLayoutParams.softInputMode
软键盘状态效果

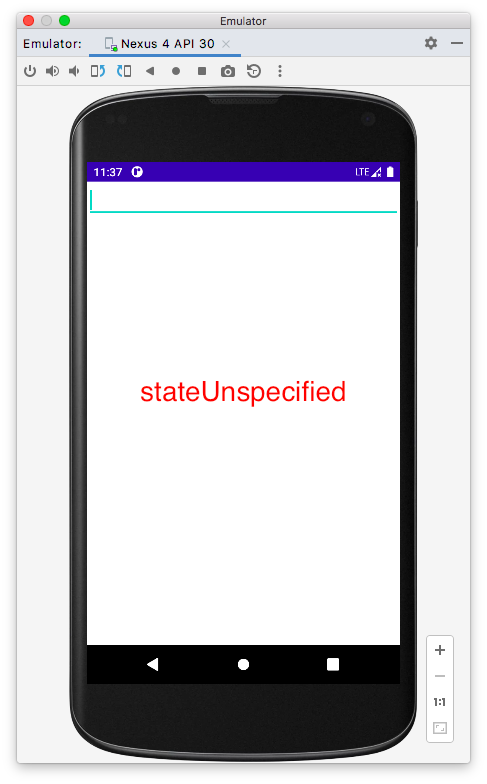

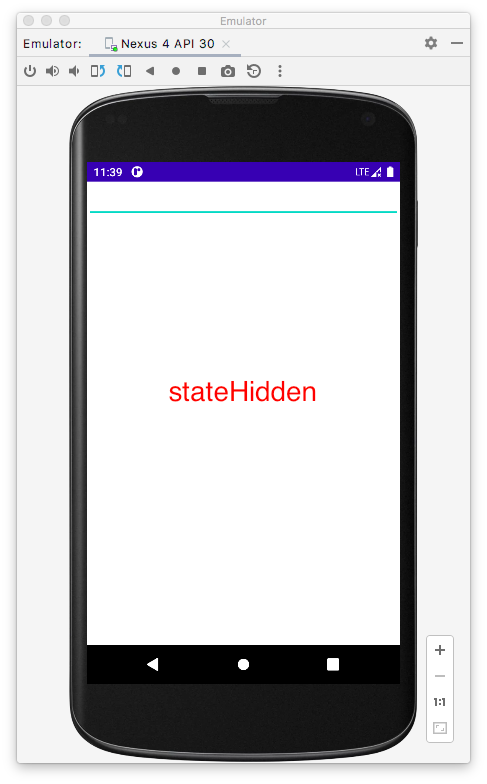

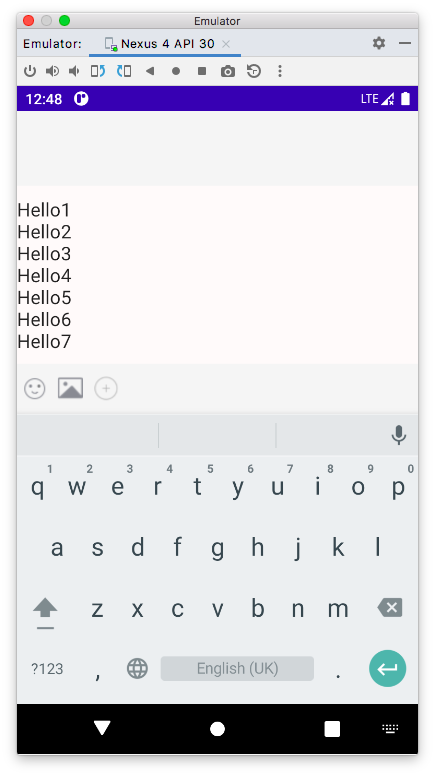
我们可能想在EditText下有一个工具栏,提供一些工具操作选项,类似QQ那样的效果,如下左图,如果不指定android:windowSoftInputMode或者指定的android:windowSoftInputMode不为adjustResize的话,在弹出软键盘的时候,软键盘会覆盖下面的工具栏。只有将android:windowSoftInputMode设置为adjustResize的时候,才不会将下面的工具栏覆盖。将android:windowSoftInputMode设置为adjustResize将调整整个主窗口的大小,使之变得更小,为软键盘腾出空间。
public class EditTextSimpleChatTest extends Activity {
    protected void onCreate(Bundle savedInstanceState) {
        super.onCreate(savedInstanceState);

        LinearLayout contentLayoutView = new LinearLayout(this);
        contentLayoutView.setGravity(Gravity.BOTTOM);
        setContentView(contentLayoutView);

        LinearLayout inputLayout = new LinearLayout(this);
        inputLayout.setOrientation(LinearLayout.VERTICAL);
        inputLayout.setBackgroundColor(getResources().getColor(R.color.white_smoke));

        LinearLayout.LayoutParams inputLayoutParams = new LinearLayout.LayoutParams(
                LinearLayout.LayoutParams.MATCH_PARENT,
                LinearLayout.LayoutParams.WRAP_CONTENT
        );
        inputLayout.setLayoutParams(inputLayoutParams);
        contentLayoutView.addView(inputLayout);

        EditText editTextField = new EditText(this);
        editTextField.setBackgroundColor(getResources().getColor(R.color.snow));
        editTextField.setPadding(0, 20, 0, 20);

        LinearLayout.LayoutParams editTextFieldLayoutParams = new LinearLayout.LayoutParams(
                RelativeLayout.LayoutParams.MATCH_PARENT,
                RelativeLayout.LayoutParams.WRAP_CONTENT
        );
        editTextField.setLayoutParams(editTextFieldLayoutParams);
        inputLayout.addView(editTextField);

        LinearLayout toolbarLayout = new LinearLayout(this);
        toolbarLayout.setBackgroundColor(getResources().getColor(R.color.white_smoke));
        toolbarLayout.setOnClickListener(new View.OnClickListener() {
            @Override
            public void onClick(View v) {

            }
        });
        LinearLayout.LayoutParams toolbarLayoutParams = new LinearLayout.LayoutParams(
                RelativeLayout.LayoutParams.MATCH_PARENT,
                96
        );
        toolbarLayout.setLayoutParams(toolbarLayoutParams);
        inputLayout.addView(toolbarLayout);

        ImageView emotion = new ImageView(this);
        emotion.setImageResource(R.drawable.toolbar_emoticon_normal);
        emotion.setPadding(10, 20, 10, 20);
        LinearLayout.LayoutParams emotionLayoutParams = new LinearLayout.LayoutParams(
                LinearLayout.LayoutParams.WRAP_CONTENT,
                LinearLayout.LayoutParams.WRAP_CONTENT
        );
        emotionLayoutParams.gravity = Gravity.CENTER;
        emotion.setLayoutParams(emotionLayoutParams);
        toolbarLayout.addView(emotion);

        ImageView photo = new ImageView(this);
        photo.setPadding(10, 20, 10, 20);
        photo.setImageResource(R.drawable.toolbar_photo_normal);
        LinearLayout.LayoutParams photoLayoutParams = new LinearLayout.LayoutParams(
                LinearLayout.LayoutParams.WRAP_CONTENT,
                LinearLayout.LayoutParams.WRAP_CONTENT
        );
        photoLayoutParams.gravity = Gravity.CENTER;
        photo.setLayoutParams(photoLayoutParams);
        toolbarLayout.addView(photo);

        ImageView more = new ImageView(this);
        more.setPadding(10, 20, 10, 20);
        more.setImageResource(R.drawable.toolbar_add_normal);
        LinearLayout.LayoutParams moreLayoutParams = new LinearLayout.LayoutParams(
                LinearLayout.LayoutParams.WRAP_CONTENT,
                LinearLayout.LayoutParams.WRAP_CONTENT
        );
        moreLayoutParams.gravity = Gravity.CENTER;
        more.setLayoutParams(moreLayoutParams);
        toolbarLayout.addView(more);

        Log.i(getClass().getName(), "softInputMode: " + getWindow().getAttributes().softInputMode);

        contentLayoutView.setOnClickListener(new View.OnClickListener() {

            @Override
            public void onClick(View v) {
                hideIme(EditTextSimpleChatTest.this);
            }
        });
    }

    public void hideIme(Activity context) {
        if (context == null)
            return;
        final View v = context.getWindow().peekDecorView();
        if (v != null && v.getWindowToken() != null) {
            InputMethodManager imm = (InputMethodManager) context.getSystemService(Activity.INPUT_METHOD_SERVICE);
            imm.hideSoftInputFromWindow(v.getWindowToken(), 0);
        }
    }
}
 |
 |
public class EditTextChatTest extends Activity {
    protected void onCreate(Bundle savedInstanceState) {
        super.onCreate(savedInstanceState);

        LinearLayout contentLayoutView = new LinearLayout(this);
        contentLayoutView.setGravity(Gravity.BOTTOM);
        setContentView(contentLayoutView);

        RelativeLayout inputLayout = new RelativeLayout(this);
        inputLayout.setBackgroundColor(getResources().getColor(R.color.white_smoke));

        LinearLayout.LayoutParams inputLayoutParams = new LinearLayout.LayoutParams(
                LinearLayout.LayoutParams.MATCH_PARENT,
                LinearLayout.LayoutParams.WRAP_CONTENT
        );
        inputLayout.setLayoutParams(inputLayoutParams);
        contentLayoutView.addView(inputLayout);

        EditText editTextField = new EditText(this);
        editTextField.setBackgroundColor(getResources().getColor(R.color.snow));
        editTextField.setPadding(0, 20, 0, 116);

        RelativeLayout.LayoutParams editTextFieldLayoutParams = new RelativeLayout.LayoutParams(
                RelativeLayout.LayoutParams.MATCH_PARENT,
                RelativeLayout.LayoutParams.WRAP_CONTENT
        );
        editTextFieldLayoutParams.addRule(RelativeLayout.ALIGN_PARENT_BOTTOM);
        editTextField.setLayoutParams(editTextFieldLayoutParams);
        inputLayout.addView(editTextField);

        LinearLayout toolbarLayout = new LinearLayout(this);
        toolbarLayout.setBackgroundColor(getResources().getColor(R.color.white_smoke));
        toolbarLayout.setOnClickListener(new View.OnClickListener() {
            @Override
            public void onClick(View v) {

            }
        });
        RelativeLayout.LayoutParams toolbarLayoutParams = new RelativeLayout.LayoutParams(
                RelativeLayout.LayoutParams.MATCH_PARENT,
                96
        );
        toolbarLayoutParams.addRule(RelativeLayout.ALIGN_PARENT_BOTTOM);
        toolbarLayout.setLayoutParams(toolbarLayoutParams);
        inputLayout.addView(toolbarLayout);

        ImageView emotion = new ImageView(this);
        emotion.setImageResource(R.drawable.toolbar_emoticon_normal);
        emotion.setPadding(10, 20, 10, 20);
        LinearLayout.LayoutParams emotionLayoutParams = new LinearLayout.LayoutParams(
                LinearLayout.LayoutParams.WRAP_CONTENT,
                LinearLayout.LayoutParams.WRAP_CONTENT
        );
        emotionLayoutParams.gravity = Gravity.CENTER;
        emotion.setLayoutParams(emotionLayoutParams);
        toolbarLayout.addView(emotion);

        ImageView photo = new ImageView(this);
        photo.setPadding(10, 20, 10, 20);
        photo.setImageResource(R.drawable.toolbar_photo_normal);
        LinearLayout.LayoutParams photoLayoutParams = new LinearLayout.LayoutParams(
                LinearLayout.LayoutParams.WRAP_CONTENT,
                LinearLayout.LayoutParams.WRAP_CONTENT
        );
        photoLayoutParams.gravity = Gravity.CENTER;
        photo.setLayoutParams(photoLayoutParams);
        toolbarLayout.addView(photo);

        ImageView more = new ImageView(this);
        more.setPadding(10, 20, 10, 20);
        more.setImageResource(R.drawable.toolbar_add_normal);
        LinearLayout.LayoutParams moreLayoutParams = new LinearLayout.LayoutParams(
                LinearLayout.LayoutParams.WRAP_CONTENT,
                LinearLayout.LayoutParams.WRAP_CONTENT
        );
        moreLayoutParams.gravity = Gravity.CENTER;
        more.setLayoutParams(moreLayoutParams);
        toolbarLayout.addView(more);

        Log.i(getClass().getName(), "softInputMode: " + getWindow().getAttributes().softInputMode);

        contentLayoutView.setOnClickListener(new View.OnClickListener() {

            @Override
            public void onClick(View v) {
                hideIme(EditTextChatTest.this);
            }
        });
    }

    public void hideIme(Activity context) {
        if (context == null)
            return;
        final View v = context.getWindow().peekDecorView();
        if (v != null && v.getWindowToken() != null) {
            InputMethodManager imm = (InputMethodManager) context.getSystemService(Activity.INPUT_METHOD_SERVICE);
            imm.hideSoftInputFromWindow(v.getWindowToken(), 0);
        }
    }
}


启动界面
SplashScreen
场景
Scene


相关推荐
android:Activity中切换不同状态页:加载中,加载失败,数据页,空页面……
1、设计界面,包括四个按钮,两个文本框。单击对应按钮可以启动对应...假定Activity A为启动Activity。 2、修改 Activity 的启动模式 LaunchMode,并通过 Log 信息来体会不同启动模式所对应的Activity 和 task 的关系
Android中采用任务栈的形式来管Activity。栈是一种“先进后出”的数据结构。 Android中的任务栈 Task Stack in Android Activity的启动模式 Activity startup mode Activity的启动模式 Activity startup mode ...
androidx activity-1.2.3版本资源包
android:exported 是Android中的四大组件 Activity,Service,Provider,Receiver 四大组件中都会有的一个属性。 总体来说它的主要作用是:是否支持其它应用调用当前组件。 例如: <activity nandroid:exported=...
android:scheme 通过uri跳转到APP应用指定Activity
# Android中Activity四种启动模式和taskAffinity属性详解 #
Android程序技术:Activity数据传递.pptx
Android 程序技术 本节课程内容:Activity及log类简介 2个界面创建 Activity的创建 Creation of activity 1)第1个界面创建:包名处点击右键选择【New】【Activity】【Empty Activity】选项,填写MainActivity...
Android状态保存、用户偏好设置保存、通过universal_image_loder网络加载图片并做图片缓存处理Demo ... <activity android:name="com.example.save.MainActivity" > </activity> 整个程序就完成了。
Android总Activity的启动模式分为四种: Activity启动模式设置: <activity android:name=".MainActivity"android:launchMode="standard" /> Activity的四种启动模式: 1.standard 模式启动模式,每次激活...
Android:Intent页面跳转,Activity生命周期,Service服务,广播代码实例
android:Fragment和Activity之间的通讯分享.pdf
在android开发中Activity相当于web开发的页面,或者说如j2ee开发中对应的jsp页面。在开发jsp时,经常会遇到页面跳转的问题,在android也同样会遇到。以下的几个例子是我对android的Activity跳转的小结。
Android的Activity周期 Android的Activity周期 Android的Activity周期 Android的Activity周期 Android的Activity周期 Android的Activity周期 Android的Activity周期 Android的Activity周期 Android的Activity周期
Android学习笔记(九):Activity-RelativeLayout
Android学习笔记(十一):Activity-ListView
Android学习笔记(十二):Activity-Spinner
第6章以ActivityManagerService为分析重点,它的启动、Activity的创建和启动、BroadcastReceiver的工作原理、Android中的进程管理等内容展开了较为深入的研究;第7章对ContentProvider的创建和启动、SQLite、Cursor ...
androidx 离线类包1